
Hallo teman-teman, apa kabar semuanya. Tentu nya sehat selalu dan bahagia ya untuk lebih semangat dalam belajar seputar website, berjumpa kembali dengan saya pada tutorial Dumet School. Di artikel kemarin kita sudah belajar tentang Cara Membuat Form Input Interaktif Dengan Jquery Part 1 dimana kita mempunyai sebuah form input dengan 3 tampilan yaitu Create your account, Social Profiles, Personal Details. Kali ini kita akan melanjutkan Cara Membuat Form Input Interaktif Dengan Jquery Part 2, dan kita akan memberikan fungsi Jquery nya agar form yang kita buat lebih interaktif. Berikut ini adalah demo gambar yang akan kita berikan fungsi Jquery nya

Nah langkah berikutnya kita akan mengaktifkan button next dan previous dengan Jquery, pertama-tama download terlebih dahulu jquery-1.9.1.min.js dan jquery.easing.min.js atau bisa download di link ini untuk kita panggil dan berikan fungsi nya pada html nya. Jika sudah di download, simpan di dalam folder js kemudian pada html nya kita panggil di dalam tag head nya seperti gambar di bawah ini
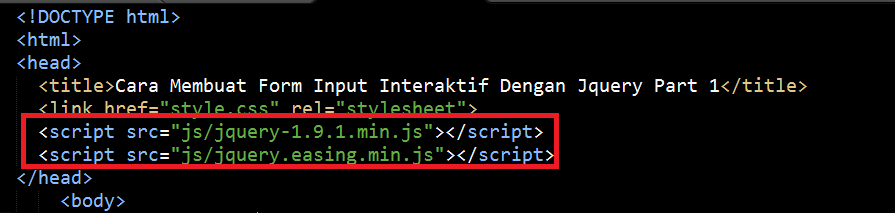
Berikutnya kita akan implementasikan Cara Membuat Form Input Interaktif Dengan Jquery Part 2 dengan menambahkan fungsi Jquery nya, teman-teman copy script di bawah ini
<script type="text/javascript">
   //jQuery time
   var current_fs, next_fs, previous_fs; //fieldsets
   var left, opacity, scale; //fieldset properties which we will animate
   var animating; //flag to prevent quick multi-click glitches

   $(".next").click(function(){
    if(animating) return false;
    animating = true;

    current_fs = $(this).parent();
    next_fs = $(this).parent().next();

    //activate next step on progressbar using the index of next_fs
    $("#progressbar li").eq($("fieldset").index(next_fs)).addClass("active");

    //show the next fieldset
    next_fs.show();
    //hide the current fieldset with style
    current_fs.animate({opacity: 0}, {
     step: function(now, mx) {
      //as the opacity of current_fs reduces to 0 - stored in "now"
      //1. scale current_fs down to 80%
      scale = 1 - (1 - now) * 0.2;
      //2. bring next_fs from the right(50%)
      left = (now * 50)+"%";
      //3. increase opacity of next_fs to 1 as it moves in
      opacity = 1 - now;
      current_fs.css({'transform': 'scale('+scale+')'});
      next_fs.css({'left': left, 'opacity': opacity});
     },
     duration: 800,
     complete: function(){
      current_fs.hide();
      animating = false;
     },
     //this comes from the custom easing plugin
     easing: 'easeInOutBack'
    });
   });
   $(".previous").click(function(){
    if(animating) return false;
    animating = true;

    current_fs = $(this).parent();
    previous_fs = $(this).parent().prev();

    //de-activate current step on progressbar
    $("#progressbar li").eq($("fieldset").index(current_fs)).removeClass("active");

    //show the previous fieldset
    previous_fs.show();
    //hide the current fieldset with style
    current_fs.animate({opacity: 0}, {
     step: function(now, mx) {
      //as the opacity of current_fs reduces to 0 - stored in "now"
      //1. scale previous_fs from 80% to 100%
      scale = 0.8 + (1 - now) * 0.2;
      //2. take current_fs to the right(50%) - from 0%
      left = ((1-now) * 50)+"%";
      //3. increase opacity of previous_fs to 1 as it moves in
      opacity = 1 - now;
      current_fs.css({'left': left});
      previous_fs.css({'transform': 'scale('+scale+')', 'opacity': opacity});
     },
     duration: 800,
     complete: function(){
      current_fs.hide();
      animating = false;
     },
     //this comes from the custom easing plugin
     easing: 'easeInOutBack'
    });
   });

   $(".submit").click(function(){
    return false;
   })
</script>
Dan pastekan di dalam file html nya, jika sudah save dan refresh pada browsernya. Kemudian klik tombol next sampai ke tampilan yang terakhir dan akan ada tombol submit, maka semua tombol sudah berhasil di berikan fungsi Jquery nya dan form input terlihat lebih menarik. Untuk teman-teman yang sekarang belum ada script html dan css nya kalian bisa lihat tutorial sebelumnya Cara Membuat Form Input Interaktif Dengan Jquery Part 1.
Baik, mungkin sekian dulu pada artikel kali ini tentang Cara Membuat Form Input Interaktif Dengan Jquery Part 2, kita berjumpa lagi di tutorial berikutnya. Semoga bermanfaat dan bisa menjadi refrensi untuk teman-teman.
Sampai Jumpa dan Terima Kasih.